Dry back flooring installation method:
-For indoor use only
-Check all floor panels before installation.

1.Keep the LVT vinyl floor and adhesive at room temperature [18-25℃] for 48h before installation.
2.Substrate must be clean,dry (75% RH/max 3.0CM% ),level and hard.
3.Mix panels sufficiently before installing them.
4.Determine the center line and divide the room into smaller sections.Apply glue and install flooring per section.Start installation from the side.
5.Roll the completed floor immediately after installation,before the adhesive sets,to ensure good adhesion.
6.Wait 24h after installation before allowing traffic.
Self-stick flooring installation method:
-For indoor use only
-Check all floor panels before installation.

1.Acclimate adhesive floor 48h before installation at room temperature [64.4-77°F].
2.Subfloor must be clean,dry (75% RH/max 3.0CM% ),level and hard.
3.Mix panels sufficiently before installing them.
4.Switch off your floor heating from 24h before until 48h after installation.
5.Determine the center line and divide the room into smaller sections.Peel the paper behind the LVT and stick on the floor section per section.
6.Roll the completed floor immediately after installation,before the adhesive sets,to ensure good adhesion.
7.Wait 24h after installation before allowing traffic.
8.This is a quick guide.Please read the detailed installation instruction carefully before the installation of the flooring.
Click system flooring installation method:
-For indoor use only
-Check all floor panels before installation.

1.Keep the LVT vinyl floor and adhesive at room temperature [18-25℃] for 48h before installation.
2.Substrate must be clean,dry (75% RH/max 3.0CM% ),level and hard.
3.Mix panels sufficiently before installing them.
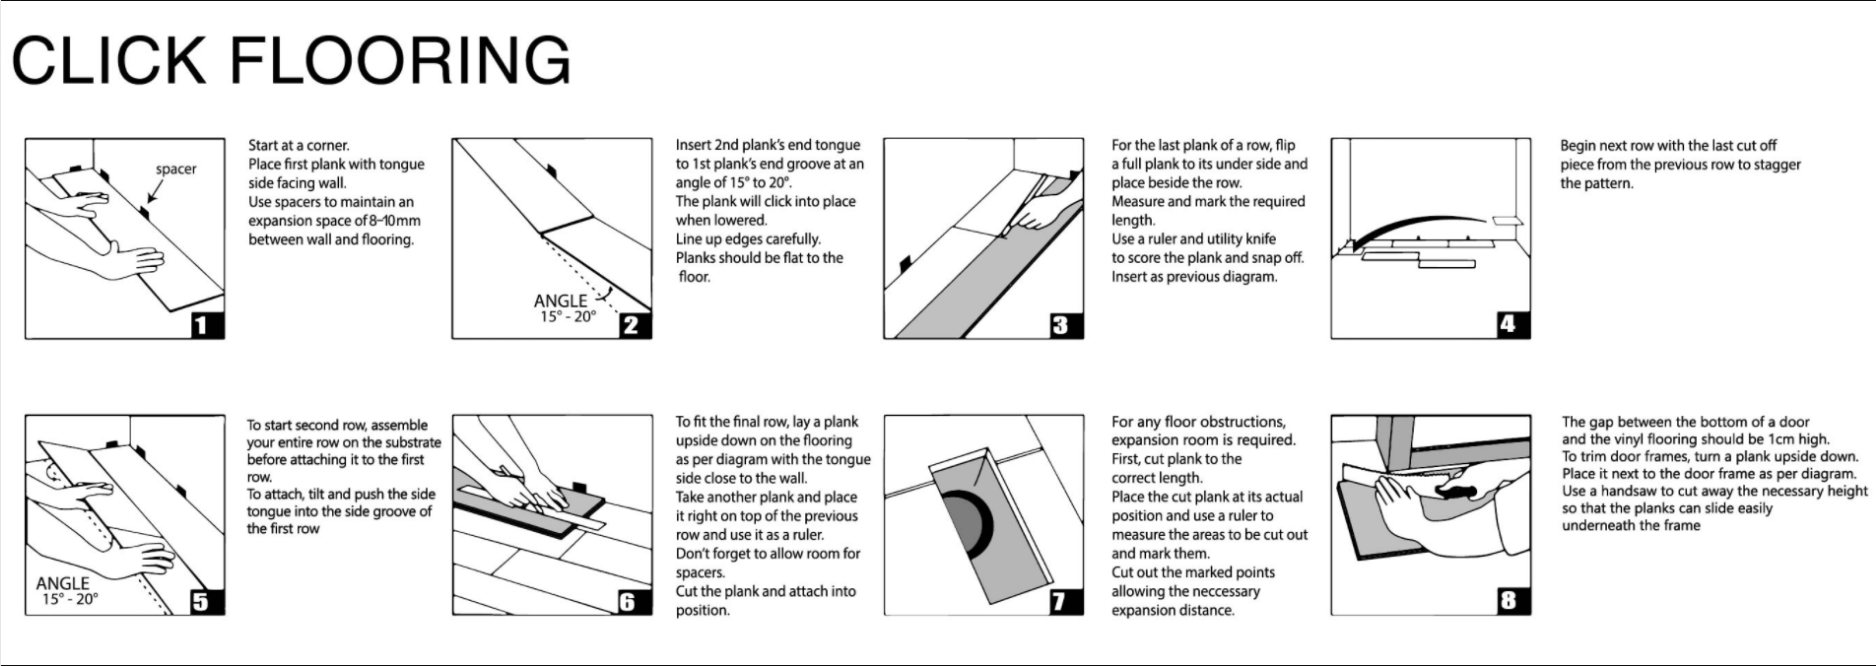
4.Start at a corner.Place first plank with tongue side facing wall.Use spacers to maintain an expansion space of 8-10mm between wall and flooring.
5.Insert 2nd plank’s end tongue to 1st plank’s end groove at an angle of 15°to 20°.The plank will click into place when lowered.Line up edges carefully.Planks should be flat to the floor.
6.For the last plank of a row,flip a full plank to its under side and place beside the row.Measure and mark the required length.Use a ruler and utility knife to score the plank and snap off.Insert as previous diagram.
7.Begin next row with the last cut off piece from the previous row to stagger the pattern.
8.To start second row,assemble your entire row on the substrate before attaching it to the first row.To attach,tilt and push the side tongue into the side groove of the first row.
9.To fit the final row,lay a plank upside down on the flooring as per diagram with the tongue side close to the wall.Take another plank and place it right on top of the previous row and use it as a ruler.Don’t forget to allow for spacers.Cut the plank and attach into position.
10.For any floor obstructions,expansion room is required.First,cut plank to the correct length.Place the cut plank at its actual position and use a ruler to measure the areas to be cut out and mark them.Cut out the marked points allowing the necessary expansion distance.
11.The gap between the bottom of a door and the vinyl flooring should be 1cm high.To trim door frames,turn a plank upside down.Place it next to the door frame as per diagram.Use a handsaw to cut away the necessary height so that the plank can slide easily underneath the frame.
Loose lay flooring installation method:
-For indoor use only
-Check all floor panels before installation

1.Keep the LVT vinyl floor at room temperature [18-25℃] for 48h before installation.
2.Substrate must be clean,dry (75% RH/max 3.0CM% ),level and hard.
3.Mix panels sufficiently before installing them.
4.Determine the center line and divide the room into smaller sections.Install flooring per section.Start installation from the side.
5.Roll the completed floor after installation.
6.Wait 24h after installation before allowing traffic.


